How to Activate a Timer Before It Activates Again
Programmable Timer for Activation of Devices - Part II
In this the second part you'll larn how to implement the timer and function to plan the hour to actuate the device.
Intermediate Full instructions provided 2 hours 1,744
Things used in this project
Hardware components | ||||||
 | × | i | ||||
| × | 1 | ||||
| × | 1 | |||||
| × | 1 | ||||
| × | i | ||||
| × | 1 | |||||
| × | ane | ||||
Software apps and online services | ||||||
 | ||||||
Story
Introduction
In the starting time part of this article, we presenting how to create all the process to implement this project. You can access the first office in the link (Access the kickoff part of the Article)
Now, through this second office, we'll nowadays all processes to create the functions to program the clock and appointment and program the hr of device activation.
Therefore, through these functions, nosotros'll larn several principles of application and uses of Real-Fourth dimension Clock (RTC) DS1307.
Proposed Functions for the Projection
According to explicate in office I, the project has an aim to activate and deactivate the device in a programmed 60 minutes past the user.
Therefore, based on the problem, is demand to use the Fleck Real-Time Clock. The Flake is used to count 7 variables: 2d, minute, hour, twenty-four hour period of wee, date of the month, month and year. And then, for this, is need to implement a organisation of the hour for user adjust the hour, the date, the activation, and deactivation 60 minutes.
For this, several functions will be implemented to solve this trouble according to the diagram shown in the Part I. So, we'll develop the functions to configure the bodily time and the date of the Real-Time Clock and hour to actuate the device connected in the relay.
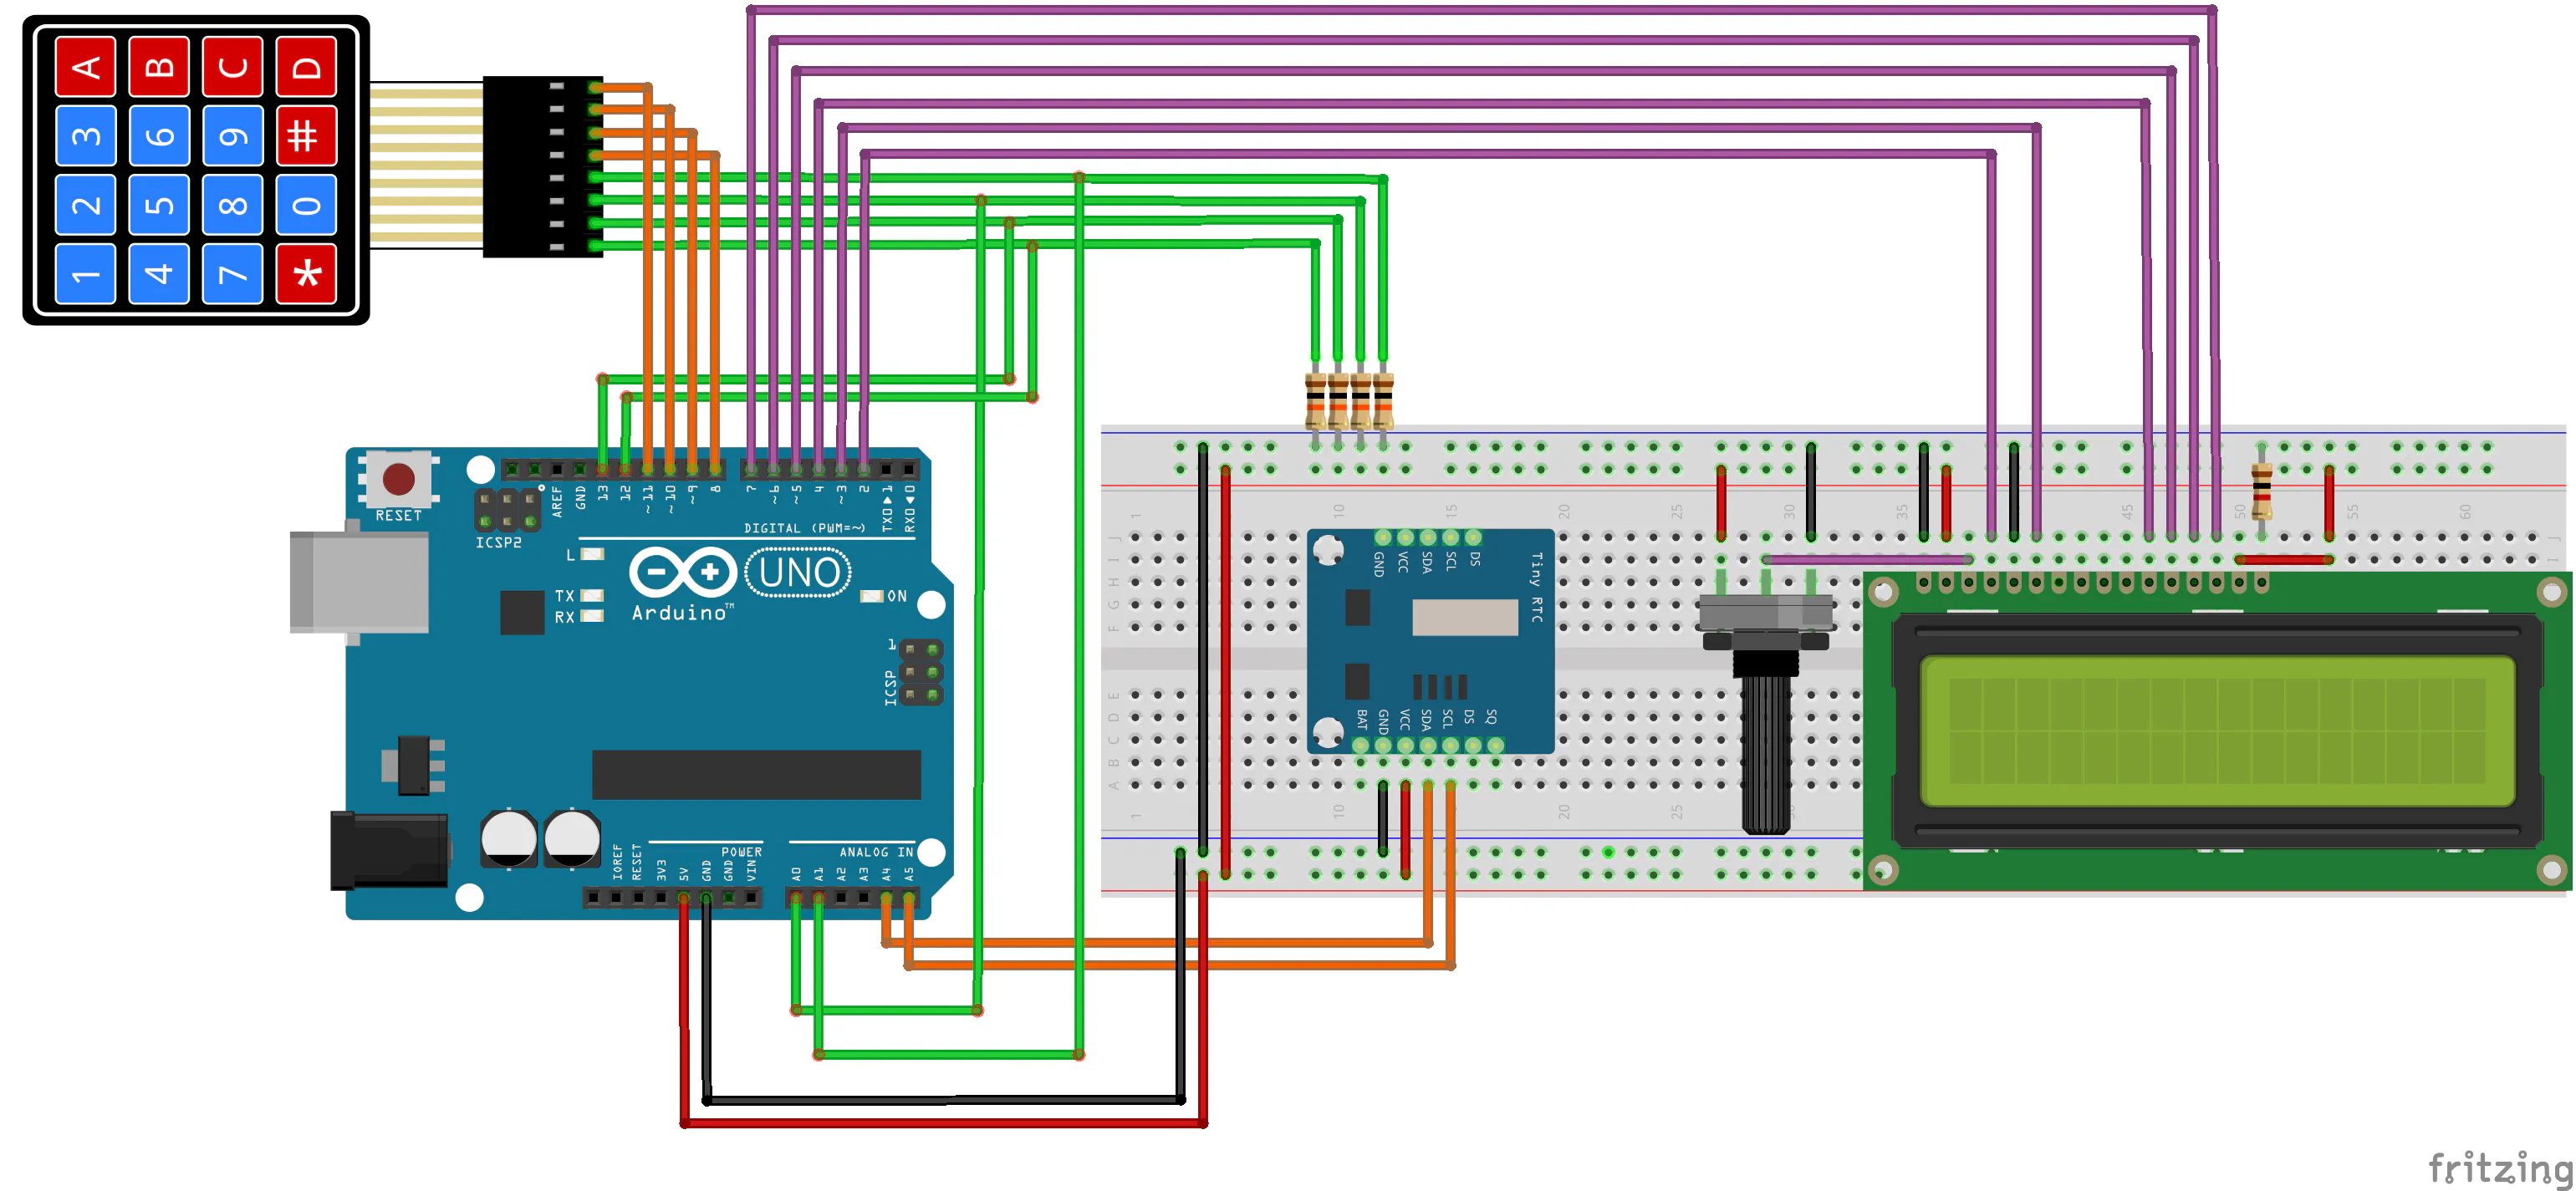
Futurity will exist presented the schematic excursion in Figure ii and code adult for the second part of the project.
Figure 2 - Electronic Schematic of the Project of Part I.
Development of the Project
Firstly, we'll nowadays the configuration process through the variable cosmos and device initialization.
Thus, earlier entering in void setup(), was include all libraries, variables and role prototypes. Therefore, see that were implemented three functions: ReadKeypad, AdjustHour, and ActivationHour.
Hereafter each function is specified below:
- ReadKeyPad() : Perform the reading of keypad buttons and through this keypad, are used the numbers and its letters. The "A" letter of the alphabet is used to Adapt the hours, "C" volition be used to clear the 60 minutes data and "D" will be used as a key to terminate the configuration of parameters.
- AdjustTime() : Responsible to adjust the internal date and hour of the DS1307;
- ActivationHour() : Used to adjust the hour to actuate the device connected in the relay.
                              #include <DS1307.h>
                #include <Wire.h>
                #include <EEPROM.h>
                #include <LiquidCrystal.h>

                #define Retention 100

                const int rs = 2, en = 3, d4 = 4, d5 = five, d6 = six, d7 = 7;

                LiquidCrystal lcd(rs, en, d4, d5, d6, d7);
                char tempo[9] = "";
                char data[ix] = "";
                int DataTime[7];
                byte SegAnt = 0, SegAtual = 0;

                byte ReadKeyPad(void);
                void AdjustTime(void);
                void ActivationHour(void);

                void setup()
                {
                                  Series.begin(9600);
                                  DS1307.brainstorm();

                                  //Config pins to control columns of the matrix keyboard
                                  for(int cardinal = eight; key < 12; key++)
                                  {
                                  pinMode(key, OUTPUT);
                                  }

                                  //Config pins to read lines of the matrix keyboard
                                  for(int cardinal = 12; primal < 16; cardinal++)
                                  {
                                  pinMode(key, INPUT);
                                  }

                                  for(int key = 8; cardinal < 12; key++)
                                  {
                                  digitalWrite(central, LOW);
                                  }

                                  lcd.begin(sixteen,2);
                }
Right after epitome declarations, were initialized the devices RTC DS1307 and LCD 16x2 and all pins of Arduino are configured.
At present, we'll learn how works the logical programming for this system through the function void loop().
Master Logic of the Project
At first, when the system is at the beginning of the loop office is performed the verification of the initialization procedure. This verification is represented by the outset condiction equally is presented below.
if(EEPROM.read(MEMORY) != 73) In this way, the organisation verifies it is the offset time that the user enters in the organization. Case the read number of the EEPROM (position 100) was dissimilar from 73, is demand to configure the time and date of the system.
And then, later config the fourth dimension and date, the system writes the 73 value in the EEPROM.
EEPROM.write(MEMORIA, 73); This number was used to bespeak for the user, that the time and date already be configured.
                              void loop()
                {
                                  if(EEPROM.read(MEMORIA) != 73)
                                  {
                                  AjustarHora();
                                  EEPROM.write(MEMORIA, 73);
                                  lcd.clear();
                                  ActivationHour();
                                  }

                                  DS1307.getDate(DataTime);
                                  SegAtual = DataTime[6];

                                  if(LerTeclado() == 10)
                                  {
                                  AjustarHora();
                                  lcd.clear();
                                  ActivationHour();
                                  lcd.articulate();
                                  }

                                  if(abs(SegAtual - SegAnt) >= 1)
                                  {

                                  sprintf(tempo, "%02d:%02d:%02d", DataTime[4], DataTime[5], DataTime[six]);
                                  sprintf(data, "%02d/%02d/%02d", DataTime[2], DataTime[one], DataTime[0]);

                                  lcd.setCursor(4,1);
                                  lcd.print(tempo);
                                  lcd.setCursor(4,0);
                                  lcd.print(data);
                                  SegAnt = SegAtual;

                                  }
                }
Afterhere, all 7 parameters of date and fourth dimension are acquisited and stored in the DataTime vector.
After the acquisition, the value of seconds is stored in the variable SegAtual. This variable is used to store the value of thesecond. The commands are presented beneath.
                              DS1307.getDate(DataTime);
                SegAtual = DataTime[half dozen];
At present, volition be executed the status to know if the user pressed the key "A" to adapt the clock fourth dimension and the hour of activation of the device.
The key "A" is represented past 10, which is a returned value of the function when "A" is pressed, as is shown hereafter.
                              if(LerTeclado() == 10)
                {
                                  AjustarHora();
                                  lcd.clear();
                                  ActivationHour();
                                  lcd.articulate();
                }
Lastly, the hour and the data are presented in the Display LCD. So that the 60 minutes and the date are presented, was implemented the following condition below.
if(abs(SegAtual - SegAnt) >= 1)
{
sprintf(tempo, "%02d:%02d:%02d", DataTime[4], DataTime[v], DataTime[6]);
sprintf(information, "%02d/%02d/%02d", DataTime[ii], DataTime[1], DataTime[0]);
lcd.setCursor(4,ane);
lcd.impress(tempo);
lcd.setCursor(iv,0);
lcd.impress(data);
SegAnt = SegAtual;
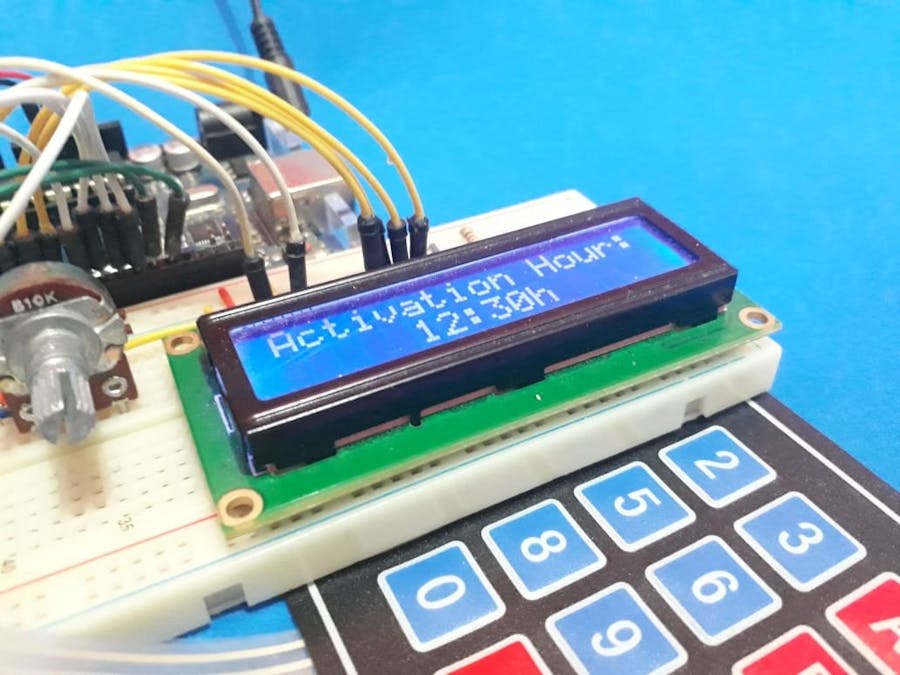
} So, through this condition, the date and hour will appear in LCD each one second, as is show in Figure 3.
Figure 3 - 60 minutes and Date shown in the LCD.
Now, will explain the functions to conform the fourth dimension and accommodate the hour to actuate the device connected on the relay.
Functions to Adjust the Clock and Activation Hour of the Device
Firstly, the functions are very like and at present, you'll run across the working of each ane. In this fashion, we'll analyze the AdjustTime() function.
AdjustTime Office
Now, with our role, we'll encounter that some parts this function is repeated himself throughout the function and y'all'll come across that the role is divided into 2 parts:
- Insert hour and minute of the clock,
- Insert data of calendar month, month and year;
Firstly, we create all thevariables used in the function.
void AdjustTime()
{
int times[6];
int DadosTempo[7];
bool controle = 0;
bool EstadoSobe = 0, EstadoDesce = 0;
byte cont = 0;
byte number = 0;
int digitos[six];
byte PosCursor = 0;
byte t = 0;
bool Validate = 0;
char tempo[seven] = "";
char information[fifteen] = "";
DS1307.getDate(DadosTempo);
sprintf(tempo, "%02d:%02dh", DadosTempo[iv], DadosTempo[5]);
sprintf(data, "%02d/%02d/%02d", DadosTempo[ii], DadosTempo[1], DadosTempo[0]);
times[4] = DadosTempo[4];
times[five] = DadosTempo[five];
times[3] = DadosTempo[three];
times[2] = DadosTempo[2];
times[1] = DadosTempo[1];
times[0] = DadosTempo[0];
times[6] = DadosTempo[vi];
digitos[0] = times[4]/10; //Armazena a Dezena das Horas
digitos[1] = times[4]%10; //Armazena a Unidade das Horas
digitos[2] = times[5]/10; //Armazena a Dezena dos Minutos
digitos[3] = times[five]%10; //Armazena a Unidade dos Minutos
do
{
lcd.setCursor(0,0);
lcd.print(" ");
lcd.setCursor(2,0);
lcd.print("Adjust hour:");
lcd.setCursor(0,1);
lcd.print(" ");
lcd.setCursor(5,one);
lcd.print(tempo);
PosCursor = five;
do
{
number = ReadKeyPad();
delay(100);
if( (number >= 0 && number <= 9) && (controle == 0) && (cont < 4) )
{
digitos[cont] = number;
cont++;
controle = 1;
lcd.setCursor(PosCursor,1);
lcd.print(number);
PosCursor++;
if(cont == ii || cont == 4)
{
PosCursor = PosCursor + 1;
}
}
if(number == 16 && controle == 1)
{
controle = 0;
}
if(number == 12)
{
for(cont = 0; cont < iv; cont++)
{
digitos[cont] = 0;
}
lcd.setCursor(0,1);
lcd.print(" ");
lcd.setCursor(v,1);
lcd.print("00:00h");
PosCursor = 5;
cont = 0;
for(int i = iv; i < half dozen; i++)
{
times[i] = 0;
}
}
}while(number != 13);
times[4] = (digitos[0]*x) + digitos[1];
times[five] = (digitos[2]*10) + digitos[three];
if((times[4] < 0 || times[4] > 23) || (times[v] < 0 || times[five] > 59))
{
lcd.clear();
lcd.setCursor(4,0);
lcd.print("Invalid");
lcd.setCursor(six,1);
lcd.impress("Hour");
filibuster(2000);
Validate = 1;
lcd.clear();
lcd.setCursor(0,0);
lcd.print(" ");
lcd.setCursor(1,0);
lcd.print("Adjust Hours:");
lcd.setCursor(0,one);
lcd.impress(" ");
lcd.setCursor(5,1);
lcd.print("00:00h");
sprintf(tempo, "%02d:%02dh", 0, 0);
PosCursor = 5;
cont = 0;
for(int i = 0; i < 4; i++)
{
times[i] = 0;
}
}
}while(Validate == 1);
practice
{
number = ReadKeyPad();
filibuster(200);
}while(number != sixteen);
/*--------------------------------Appointment Configuration--------------------------------*/
PosCursor = iv;
exercise
{
//Transformacao dos digitos da data para dezenas e unidades
digitos[0] = times[ii]/10; //Armazena a Dezena da Information
digitos[ane] = times[two]%10; //Armazena a Unidade da Data
digitos[2] = times[1]/10; //Armazena a Dezena practice Mes
digitos[3] = times[i]%10; //Armazena a Unidade do Mes
digitos[4] = times[0]/10; //Armazena a Dezena practice Ano
digitos[5] = times[0]%10; //Armazena a Unidade do Ano
sprintf(data, "%02d/%02d/%02d", times[2], times[1], times[0]);
lcd.setCursor(0,0);
lcd.print(" ");
lcd.setCursor(2,0);
lcd.print("Suit Date:");
lcd.setCursor(0,1);
lcd.print(" ");
lcd.setCursor(4,1);
lcd.impress(data);
PosCursor = four;
cont = 0;
do
{
number = ReadKeyPad();
filibuster(100);
if( (number >= 0 && number <= 9) && (controle == 0) && (cont < 6) )
{
digitos[cont] = number;
cont++;
controle = one;
lcd.setCursor(PosCursor,ane);
lcd.impress(number);
PosCursor++;
if(cont == 2 || cont == 4)
{
PosCursor = PosCursor + 1;
}
}
if(number == 16 && controle == i)
{
controle = 0;
}
if(number == 12)
{
for(cont = 0; cont < 6; cont++)
{
digitos[cont] = 0;
}
lcd.setCursor(0,1);
lcd.impress(" ");
lcd.setCursor(4,one);
lcd.print("00/00/00");
PosCursor = 4;
cont = 0;
}
}while(number != 13);
times[2] = (digitos[0]*10) + digitos[1]; //Transformando os numeros lidos para information practise mes em dois dígitos
times[1] = (digitos[ii]*10) + digitos[three]; //Transformando os numeros lidos para mes em dois dígitos
times[0] = (digitos[4]*x) + digitos[5]; //Transformando os numeros lidos para ano em dois dígitos
if((times[2] <= 0 || times[two] > 31) || (times[one] <= 0 || times[one] > 12) || times[0] <= 0)
{
lcd.clear();
lcd.setCursor(4,0);
lcd.print("Invalid");
lcd.setCursor(vi,i);
lcd.impress("Engagement");
filibuster(2000);
Validate = 1;
lcd.clear();
lcd.setCursor(0,0);
lcd.print(" ");
lcd.setCursor(2,0);
lcd.impress("Adjuste Date:");
lcd.setCursor(0,1);
lcd.print(" ");
lcd.setCursor(3,one);
lcd.impress("00/00/00");
PosCursor = 5;
cont = 0;
for(byte i = 0; i < 3; i++)
{
times[i] = 0;
}
}
}while(Validate == 1);
practice
{
number = ReadKeyPad();
delay(200);
}while(number != 16);
lcd.articulate();
DS1307.setDate(times[0],times[1],times[ii],times[iii],times[4],times[5],00);//year,month,date of calendar month, day of week,hour,minutes,second
} Future, the part of DS1307 acquisition of the data and store in the DadosTempo and after, split the values and print in the strings "tempo" and "data". These two strings are used to print its information in the LCD, posteriorly.
                              DS1307.getDate(DadosTempo);

                sprintf(tempo, "%02d:%02dh", DadosTempo[4], DadosTempo[5]);
                sprintf(data, "%02d/%02d/%02d", DadosTempo[2], DadosTempo[1], DadosTempo[0]);
The data of the vector "DadosTempo" are separated and stored in the vector times. The vector "times" will be used to receive the re-create and to dispense the data of the "DadosTempo" vector.
Correct after, the times[4] and times[5] will be separated into digits of tens and units, to be manipulated in the time setting.
                              times[4] = DadosTempo[4];
                                  times[5] = DadosTempo[5];
                                  times[iii] = DadosTempo[iii];
                                  times[two] = DadosTempo[2];
                                  times[one] = DadosTempo[1];
                                  times[0] = DadosTempo[0];
                                  times[six] = DadosTempo[vi];

                                  digitos[0] = times[4]/10; //Shop ten of hours
                                  digitos[ane] = times[four]%x; //Shop unit of hours
                                  digitos[2] = times[five]/10; //Store ten of minutes
                                  digitos[3] = times[5]%x; //Store unit of minutes
After this, the system presents the message "Adjust Hour:" and show the content of the "tempo" string on the 2nd line, according to the code presented below.
                              lcd.setCursor(0,0);
                                  lcd.impress("                ");
                                  lcd.setCursor(2,0);
                                  lcd.impress("Suit hour:");

                                  lcd.setCursor(0,i);
                                  lcd.print("                ");
                                  lcd.setCursor(5,i);
                                  lcd.impress(tempo);

                                  PosCursor = 5;
In Figure four is shown the bulletin presented in the LCD Brandish.
Effigy 4 - Adjust Hour Bulletin.
Once time that the bulletin is printed in the LCD, the system starts the process of reading to verify what was the pressed key by the user. This process is represented by the code beneath.
                              do
                                  {

                                  number = ReadKeyPad();
                                  delay(100);

                                  if( (number >= 0 && number <= 9) && (controle == 0) && (cont < 4) )
                                  {
                                  digitos[cont] = number;
                                  cont++;
                                  controle = 1;

                                  lcd.setCursor(PosCursor,1);
                                  lcd.print(number);
                                  PosCursor++;

                                  if(cont == 2 || cont == 4)
                                  {
                                  PosCursor = PosCursor + ane;
                                  }
                                  }

                                  if(number == 16 && controle == 1)
                                  {
                                  controle = 0;
                                  }

                                  if(number == 12)
                                  {

                                  for(cont = 0; cont < iv; cont++)
                                  {
                                  digitos[cont] = 0;
                                  }

                                  lcd.setCursor(0,1);
                                  lcd.print("                ");
                                  lcd.setCursor(five,1);
                                  lcd.print("00:00h");

                                  PosCursor = v;
                                  cont = 0;

                                  for(int i = 4; i < half-dozen; i++)
                                  {
                                  times[i] = 0;
                                  }
                                  }

                                  }while(number != 13);
Firstly, the organisation read the keypad and shop the value in the variable number and time to come, verify the condition shown beneath.
if( (number >= 0 && number <= ix) && (controle == 0) && (cont < four) ) According to condition, it verifies three important points :
- Verify if a number is pressed key is between 0 and 9;
- Verify if variable "controle" is equal at 0. This variable is used to allow that the condition is truthful simply one fourth dimension and read the number only in one case.
- Verify if variable "cont" is less than four. This variable is used to allow the user tin can enter with only 4 digits : two digits for the 60 minutes and two digits for minutes.
In this fashion, when the condition is true, the digit is stored in digit vector and printed in the LCD. Afterwards this, the variable of "PosCursor" is incremented to point for units place.
Case the cont variable is equal at ii or cont equal at 4, the cursor position is incremented again, because of the bespeak of ":". In this way, the cursor will point for the decimal identify of minutes.
Now, case the condition above doesn't be true, the following condition will exist verified. Instance anyone key is pressed by the user, the function "LerTeclado()" returns the number sixteen to represents that none key was pressed.
                              if(number == 16 && controle == 1)
                {
                                  controle = 0;
                }
So, if this condition is true, the system will aspect cypher at variable "controle". This variable is used to control admission in the condition to receive the numbers between 0 and ix pressed past the user.
Lastly, nosotros take the terminal condition to be checked. Case the "C" fundamental is pressed, the returned value is 13.
And then, through this key, the organization will articulate the values of the hour to allow the user to enter with new values again. This can see in Figure v.
Effigy five - Clear Screen of the LCD.
This is useful when the user inserts a wrong value and need to enter with new values, as is shown in Effigy vi.
Figure 6 - Incorrect Hour Inserted.
At present, see the condition of the "do while" loop. The system running in the exercise-while until the user presses the "D" key (Washed), which is represented past the value 13.
This key is used to inform at the system, that values were inserted by the user.
}while(number != 13); Future, the digits entered by the user will be mounted in an hour and tens, as is shown in the post-obit lawmaking.
                              times[4] = (digitos[0]*10) + digitos[1];
                times[5] = (digitos[2]*10) + digitos[3];

                                  if((times[4] < 0 || times[four] > 23) || (times[5] < 0 || times[5] > 59))
                                  {
                                  lcd.articulate();
                                  lcd.setCursor(four,0);
                                  lcd.impress("Invalid");
                                  lcd.setCursor(six,i);
                                  lcd.print("Hr");
                                  delay(2000);

                                  Validate = 1;

                                  lcd.clear();
                                  lcd.setCursor(0,0);
                                  lcd.impress("                ");
                                  lcd.setCursor(1,0);
                                  lcd.print("Arrange Hours:");

                                  lcd.setCursor(0,one);
                                  lcd.print("                ");
                                  lcd.setCursor(5,i);
                                  lcd.print("00:00h");

                                  sprintf(tempo, "%02d:%02dh", 0, 0);

                                  PosCursor = five;
                                  cont = 0;

                                  for(byte i = 0; i < four; i++)
                                  {
                                  times[i] = 0;
                                  }
                                  }

                }while(Validate == 1);
Finally, we accept the concluding condition. This concluding condition is used to validate the hour and infinitesimal entered by the user.
Example the values entered by the user are wrong, the boolean variable Validate volition receive 1. The value volition betoken for the system, that some of the values are wrong and present the "Invalid Hour" bulletin as is shown in Effigy vii.
Figure 7 - Invalid 60 minutes Bulletin.
Therefore, the organization will need to receive new correct values. But, if the values are correct the organization doesn't enter in this condition and pass for the 2nd part of the function: Receive the data of Date.
Process of Setting the Date
In the aforementioned course, every bit we configure the clock data, we'll set the date. The process is similar. It has the process to receive the numbers, the erase part in case of wrong digited numbers and validation procedure of the numbers entered by the user.
Lastly, after the configure all parameters, there is a part for sending the parameters for the Real-Fourth dimension Clock Scrap, as is shown beneath.
DS1307.setDate(times[0],times[1],times[2],times[three],times[4],times[5],00);//yr,calendar month,date of month, day of calendar week,hour,minutes,second Through this function, the RTC is configured with parameters of the hour and engagement. Futurity, the arrangement render for void loop part.
Right after your return for void loop role, the LCD screen will be erased and the role ActiveHour volition be called.
                              void ActivationHour(void)
                {
                                  int times[six];
                                  int  DadosTempo[7];
                                  bool controle = 0;
                                  bool EstadoSobe = 0, EstadoDesce = 0;
                                  byte cont = 0;
                                  byte number = 0;
                                  int digitos[6];
                                  byte PosCursor = 0;
                                  bool Validate = 0;
                                  lcd.clear();

                                  for(byte i = 0; i < 6; i++)
                                  {
                                  digitos[i] = 0;
                                  }

                                  do
                                  {
                                  lcd.setCursor(0,0);
                                  lcd.print("                ");
                                  lcd.setCursor(0,0);
                                  lcd.print("Activation Hour:");
                                  lcd.setCursor(0,1);
                                  lcd.impress("                ");
                                  lcd.setCursor(v,1);
                                  lcd.print("00:00h");
                                  PosCursor = 5;

                                  exercise
                                  {
                                  number = ReadKeyPad();
                                  delay(100);

                                  if( (number >= 0 && number <= nine) && (controle == 0) && (cont < four) )
                                  {

                                  digitos[cont] = number;
                                  cont++;
                                  controle = one;
                                  lcd.setCursor(PosCursor,one);
                                  lcd.print(number);
                                  PosCursor++;

                                  if(cont == 2 || cont == 4)
                                  {
                                  PosCursor = PosCursor + 1;
                                  }

                                  }

                                  if(number == 16 && controle == 1)
                                  {
                                  controle = 0;
                                  }

                                  if(number == 12)
                                  {
                                  for(cont = 0; cont < 4; cont++)
                                  {
                                  digitos[cont] = 0;
                                  }

                                  lcd.setCursor(0,one);
                                  lcd.print("                ");
                                  lcd.setCursor(five,one);
                                  lcd.impress("00:00h");
                                  PosCursor = 5;
                                  cont = 0;

                                  for(int i = iv; i < 6; i++)
                                  {
                                  times[i] = 0;
                                  }
                                  }
                                  }while(number != 13);

                                  times[4] = (digitos[0]*10) + digitos[1];
                                  times[5] = (digitos[2]*10) + digitos[iii];

                                  if((times[4] < 0 || times[4] > 23) || (times[5] < 0 || times[5] > 59))
                                  {
                                  lcd.articulate();
                                  lcd.setCursor(three,0);
                                  lcd.print("Invalid");
                                  lcd.setCursor(4,1);
                                  lcd.print("Hour");
                                  delay(2000);

                                  Validate = 1;

                                  lcd.clear();
                                  lcd.setCursor(0,0);
                                  lcd.impress("                ");
                                  lcd.setCursor(1,0);
                                  lcd.impress("Activation Hour:");

                                  lcd.setCursor(0,one);
                                  lcd.impress("                ");
                                  lcd.setCursor(v,1);
                                  lcd.print("00:00h");

                                  sprintf(tempo, "%02d:%02dh", 0, 0);

                                  PosCursor = 5;
                                  cont = 0;

                                  for(cont = 0; cont < 4; cont++)
                                  {
                                  digitos[cont] = 0;
                                  }
                                  }
                                  }while(Validate == 1);

                                  EEPROM.write(1, times[4]);
                                  EEPROM.write(2, times[5]);

                                  do
                                  {
                                  number = ReadKeyPad();
                                  filibuster(200);
                                  }while(number != 16);
                }
The office HourActivate is similar at the function to prepare the clock for RTC. The single deviation is that the values of the hr and minute are stored in the EEPROM memory, equally is shown below.
                              EEPROM.write(1, times[iv]);
                EEPROM.write(ii, times[5]);
These values are stored in the EEPROM retention to exist read at the beginning of the initialization system. Therefore, through these values, volition be possible to compare with the clock and actuate the devices in the programmed hour.
Later the total execution of the function HourActivation, the system render for void loop part and prove the engagement and hours as is shown at the commencement of the article.
Now, will explicate the new features in the next article - Role III.
Next Features to be Implemented
Through the implemented functions until now, in the third role, nosotros'll implement new features to improve the quality of our work. Futurity will nowadays the new features:
- Implement DeactivationHour() function;
- Implement a logical system to compare the clock to actuate and deactivate the device continued in the relay;
- Implement signalization to indicate the key pressed.
Acknowledgment
Thanks to the PCBWay for support the our YouTube Channel and produce and assembly PCBs with better quality.
The Silícios Lab cheers UTSOURCE to offer the electronic components.
Schematics
Code
Credits
Source: https://www.hackster.io/166068/programmable-timer-for-activation-of-devices-part-ii-802a95
0 Response to "How to Activate a Timer Before It Activates Again"
Post a Comment